Form Actions

Search
Creating a document (e.g. RFI)
From within the project, select the form type to be added (e.g. Request for Information). On the log of that form type, click the "Add New" button located on the top of the page. A blank form is displayed in edit mode. Complete the required field(s) and then click "Save".
Deleting a document (e.g. RFI)
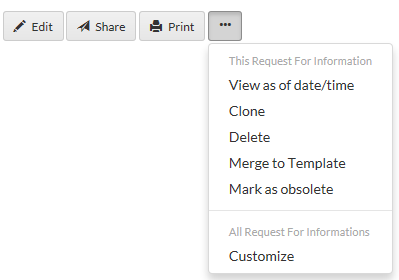
In order to delete a document, you must be the creator of that document and that document must not have been already shared. Once a document is shared, it can only be marked as obsolete. To delete a document that has not been shared that you are the owner of, click the '...' menu selecting 'Delete'. Confirm your delete by clicking 'Yes'.
Marking a document as obsolete
Projectteam.com is a collaborative system which means companies can connect with other companies on a common project while maintaining ownership of any data that has been shared to them. For this reason, once information has been shared, it can never be deleted. If a mistake has been made on a document that has been previously shared, users may choose to mark that document as obsolete. Any user who has been shared a document can mark that document as obsolete.
Documents that have been marked as obsolete will not be shown in the default log view. To view documents that have been marked as obsolete, you will need navigate to the "Obsolete Forms" log that is located on the project homepage.
Cloning a document
Users may find that often times one document is relatively close to an existing document as it pertains to the data content of that document. For this reason, cloning an existing document may be of benefit to saving data entry time. To clone an existing document start from within the project by selecting the form type you would like to Clone (e.g. Field Reports). Open the document and click the "..." button at the top of the document and click the "Clone" link. A new document will be displayed including all of the same information from the original document. Make your desired changes and then click "Save".
Viewing the state of a document at a certain date/time
Once you have access to a document, either by creating the document or having it shared to you, you have the ability to take a look back in time and see how that document looked at any date and time in the past, assuming you had access at that point in time. All information is tracked and searching information is easy. For this reason, no one can change information on you without your knowledge.
To view what a form looked liked in the past, navigate to the form you are interested in. Click the "..." button and then click the "View as of date/time" link. Choose a date and time and then click "View". Everything that you see on the form including fields, action items, reference links, attachments, activity, and access will reflect the form as it was at that date and time.
Merge to Template
Document data can be merged into a Merge Document by use of a Merge Template. To do this, click the '...' menu selecting 'Merge to Template'. Select your preconfigured template and click 'Merge'. The system will generate a Merge Document preview. From the preview window, the following options are available.
- Cancel - Cancels the merge preview and does not save the merge document
- Save and Download - This is the default option. Saves the merge document and provides an option to download to your computer
- Save and Share - Saves the merge document and launches the Share modal providing an option to share the merge document with other project team users/groups.
- This option sends and email to the shared selected users/groups notifying them that a merge document has been shared to them.
- Save and Email - Saves the merge document and launches the Email modal providing an option to email the merge document with other project team users/groups or even contacts that are not users on the project.
Supported Browsers
The Merge Document preview is supported by Google Chrome and Firefox. Internet Explorer and Safari are not supported as the preview window is not displayed in these browsers.
Document list location for a particular form type
Each form type lists its documents in list view when first selecting that form type. This list is called the log (e.g. Invoices Log, RFI Log). To view the log, select the form type on the project title bar or from the project home page, click "View Project Form Types" and select your desired form to see the list view or "log" of all documents related to that form.
Adding custom fields to a form
For information on adding custom fields, please reference the Custom Fields page.
Working with Collections
Several forms in the system include collections. The following information describes the actions that can be taken while working within these collections.
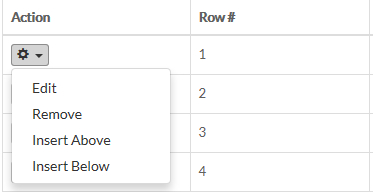
- Action - The Action column is used when attempting to edit, remove, or insert a row within the collection. Click the Action drop down and select one of the following options
- Edit - Launches the Edit modal for that row
- Remove - Launches a confirmation screen to remove that row
- No Never mind - Select this option to cancel the removal of the row
- Yes - Select this option to confirm your removal of the row. Note that the document will still need to be saved to complete this transaction.
- Insert Above - Launches the Add New modal.
- Add - Select this option to insert a row above the selected row
- Add and New - Select this option to insert a row above the selected row and add another row below that. Both rows are added above the selected row.
- Insert Below - Launches the Add New modal.
- Add - Select this option to insert a row below the selected row
- Add and New - Select this option to insert a row below the selected row and add another row below that. Both rows are added below the selected row.
- Row # - Where appropriate, a Row # is included to identify the row number
- Reorder rows - In the following forms, rows can be reordered by drag-and-drop method. When reordering rows, the Row # is reorganized accordingly.
- Contracts - Schedule of Values
- Contracts - Change Order Markups
- Contracts - Inclusions, Exclusions, and Alternates
- Potential Change Orders - Item Breakdown
- Potential Change Orders - Inclusions, Exclusions, and Alternates
- Change Orders - Change Detail
- Custom Field - Collections
Helpful Screenshots