Workflow

Search
Creating and Configuring Workflows
Before a workflow can be used on a form document, it must first be created. For information on creating and maintaining workflows, see the Help section Workflow Configuration. While every form excluding the system for Submittals, has the Workflow Panel, the use of workflow on that form type is defined in the workflow configuration - 'Available For:' field.
Starting a Workflow
Each form including Files and Folders has a Workflow Panel. Starting a workflow is as easy as clicking the 'Start New Workflow' button. Use the search option if desired to filter the list of workflows. Select one or more workflows to be applied to the document and click 'Start Workflows'. The workflow will be displayed in the workflow panel. The following rules apply to starting a workflow.
- Who Can Start This Workflow - Only users who are defined in the workflow configuration 'Who Can Start This Workflow' can start a workflow on a document for that form type.
- Restarting a Workflow - There may be times when a workflow has been cancelled. When a workflow is cancelled, a 'Restart' button is made available to restart he workflow. Only users who are defined in the workflow configuration 'Who Can Start This Workflow' can restart a workflow on a document for that form type.
- Project Specific - Workflows are project specific and must be configured in each project before using them in that project.
- Multiple Workflows - Multiple workflows and be used on any given document
- Per Document - Once a workflow is started on a document, that workflow cannot be started again on the same document, even when the workflow is completed.
- Workflow Availability - Workflow can be engaged on all forms including Files, Folders, and Custom Forms. Submittals and Submittal Packages however have their own predefined 'Submittal Workflow' not associate with this workflow.
Workflow Visual
Once a workflow has been started, it can be expanded and viewed in the workflow panel by clicking the workflow. Clicking the workflow again will collapse the workflow. The following visuals are present on each workflow that has been started
- Workflow Banner - When workflow has reached a step where your action is required, a workflow banner will be present on the top of the document associated with the workflow. If specified in the workflow configuration 'With Instructions', the workflow banner includes these instructions. Additionally, a 'View Workflow' link and 'Take Action' button are present for quick access for viewing the workflow or taking action.
- Header - Workflow Name - The workflow name is displayed in the header with a progress indicator (e.g. In Progress (Step N of M), Done). If the workflow step is in your court, a 'Take Action' button will be present in the workflow header as well as on the top of the document itself.
- Step Chart - The step chart provides a visual as to how many steps the workflow contains and the status of those steps. As the workflow progresses, the step visual progresses with a clear indicator of each stage of the workflow.
-
- Indicators - The following are indicators of the step actions
- Started - Shows the workflow 'Started' (Date Started)
- Passed - Shows the step has 'Passed' (Date Passed)
- Pending - Shows the step is 'Pending' action. If the step is pending your action, a 'Take Action' button will be present.
- Waiting - Shows remaining steps 'Waiting' for action
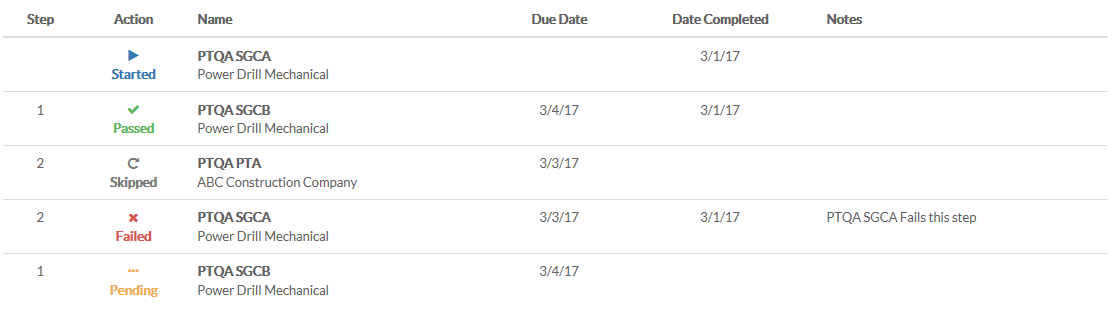
- Workflow History - As the workflow progresses, a history is kept below the workflow visual. The workflow history contains the following:
- Step # - Shows the step number in progression
- Action - Shows the action taken by the step user
- Name - Shows the name of the user who has taken action or is pending action as well as his/her associated company
- Due Date - Shows the due date where action is required before the step is marked 'Overdue'. The due date is defined by 'Days to Approve' in the workflow configuration and is calculated based on the Project Calendar configuration - Working Days.
- Date Completed - Shows the date that the step was completed. The date completed is the calculation start point for the due date on the next step.
- Notes - Displays any notes entered by the user taking action on the step
- Workflow Action Indicators
 - Shows the workflow as started
 - Shows the workflow step has been passed - workflow is moved to the next step
-
 - Shows that step 1 has cancelled the workflow. Only step 1 has the option to cancel. A 'Restart' button is available to restart the workflow.
  - Shows the workflow step has failed - workflow is moved to the previous step
 - Shows the workflow step is pending action by the user listed under the name column
 - Shows the user has been skipped. Instances where a user may be skipped are as follows:
 - Step has multiple users defined and the workflow configuration 'Who Must Approve' is set to 'Any'. If one of the step's users passes or fails a step, the other user is skipped
- User defined in a step is halted on a document. If a user is halted, the workflow moves to the next step skipping the user who has been halted
- User is removed from the project. Removing a user from the project where that user is the user who's action is required, skips that user. The workflow is moved to the next step


Taking Action on a Workflow Step
Each workflow step has a predefined user or group of users that are required to take action on their assigned step. A  button will be present on the workflow panel as well as on the top of the document when the workflow progresses to your step. The following actions apply:
- Pass - Passes the step to the next step in the workflow. If the step is the last step of the workflow, the workflow will be marked as 'Done'.
- Fail - Fails the step to any preceding step in the workflow. When failing a step, the user is provided a drop down to choose which step to fail to. If the workflow is at step 1, 'Cancel' is the option vs. 'Fail' which cancels the workflow. A 'Restart' will be present to restart the workflow as needed.
All vs. Any - The workflow configuration provides an option to select if all users in a step must take action or if any user in the step can take action on behalf of all users in the step.
- All - All users in the step must take action in order for the workflow to progress to the next step. If any user fails the step, the step fails to the previous step.
- Any - Any user of that step can take action passing or failing the step. Other users identified in the step will be skipped when action is taken by any user in the step.
Workflow Notifications
Workflow notifications are automatically triggered as workflow progresses. The following notification are sent based on the users and share groups defined in the workflow configuration:
- Send To(For Action) - This is the user to whom action is required. When the workflow reaches his/her step, the user receives a notification indicating that action is required.
- Document is auto-shared to the user
- Also Copy(For Information) - Each step of the workflow provides an option to also copy users or share groups of the project when the workflow reaches that step. Users will receive a 'Document has been Shared' notification.
- Document is auto-shared to the user/share group
Workflows in My Court
When a workflow reaches a step where action is required by you, an email will be sent to you and an indicator will be added to your Workflow Dashboard on My Page. For more information on the Workflow Dashboard, please see the Help section Workflows in My Court