Workflow Configuration
Search
Navigating to Workflow Configuration
Before using workflow in your project, it must first be setup and configured. To do this, from your Project Homepage under Project Administration, click the 'View Project Information' button in the 'Information' section. In Project Administration, click the 'Workflows' tab and then click the 'Add New' button.
Creating a Workflow
In Add Mode, add the following detail and then click 'Save' to save your workflow
- Workflow Name - Required field - Enter a Workflow Name
- Description - Enter a description for your workflow
- Available For: - Select the form or forms that this workflow will apply to. All forms including Files and Folders are available to choose from including custom forms that you may have created. Submittals and Submittal Packages are excluded as the Submittal Workflow is already a feature specifically used for Submittals.
- Use your CTRL Key to select multiple forms not in line. Use your Shift Key to select a specific set or all forms.
- Who Can Start This Workflow - Placing your cursor into this field will auto-populate a list of users and share groups from your company that have access to the project as well as users and share groups from other companies to which your company is connected. Type ahead into this field to filter your selection if necessary. One or more users can be selected to 'Start This Workflow'.
- Steps - Under the WORKFLOW STEPS section, click the 'Add Step' button
- Send To(For Action) - Required field - Place your cursor into this field to auto-populate a list of users and/or distribution lists that are from your company and from companies connected to your company on this project. Type ahead to filter the list if necessary. Select one or more users who will be responsible for taking action on this step.
- Note - Users in the Send To(For Action) field, other than the user triggering the workflow, will get an email notification requesting their action when the workflow reaches that step.
- When a workflow reaches a step where the Send To(For Action) is required, that user will automatically be shared the document to which the workflow is in progress.
- Who Must Approve - Required field - This field is an 'Any' or 'All' option.
- Any - After any user in the step takes action, the workflow moves to the next step
- All - All users in the workflow must take action on that step before the workflow moves to the next step
- Days to Approve - Required field - Enter the number of days the workflow 'Send To' has to take action on the step.
- Note - Days to Approve is configured by the defined Calendar Configuration ' Standard Working Days/Non-Standard Working Days' and 'Non-Working Days' such as holidays. For more information on Calendar Configuration see the Help section Project Calendar
- With Instructions - Enter step instructions for the user as they pertain to his step. Instructions are included in the workflow notification send to the 'Send To(For Action) user.
- Also Copy(For Information) - Easily notify others when each step of the workflow as it progresses. Place your cursor into this field to auto-populate a list of users, share groups, and/or distribution lists from your company and from companies connected to your company on this project. Type ahead to filter the list if necessary. Select one or more users or share groups who you wish to copy.
- A 'Share Document' notification will be sent to all users identified in this field.
- When a workflow reaches a step where the Also Copy(For Information) is identified, that user will automatically be shared the document to which the workflow is in progress.
- Add Step - With all information entered in Step 1, click the 'Add New Step' button or click the 'Add and New' button to add additional steps.
- Send To(For Action) - Required field - Place your cursor into this field to auto-populate a list of users and/or distribution lists that are from your company and from companies connected to your company on this project. Type ahead to filter the list if necessary. Select one or more users who will be responsible for taking action on this step.
- Save - Click the 'Save' button to save the workflow
Workflow - Configuration Access
Workflows are company specific and project specific. Only users of your company who have access to the project and have been provided workflow configuration access can edit the workflow. When a workflow is first created, the logged on user has access to the Workflow Configuration. The workflow however, can be configured to allow any user of your company to maintain the workflow configuration.
- To allow additional users access to the Workflow Configuration, as the workflow creator, click the 'Edit' button on the Configuration Access tab of the workflow. Users and share groups from your company that are on the project will be listed. For each user or share group that you wish to provide workflow configuration access to, check the 'Access' box next to their name or share group. Complete the process by clicking 'Save'. Configuration access will be indicated by the
 icon next to the users name.
 - Note that there is no partial access and users who have configuration access rights have full access to the workflow configuration including edit and delete rights.
- To remove configuration access, uncheck the 'Access box' for that user or share group and click save
Can View Workflow
NOTE: Users who are provided access to workflow configuration can also view the workflow on the form document when the workflow is engaged, even if the users is not part of the workflow itself. This assumes the configuration user is shared the document to which the workflow is associated.
Editing Workflows
Editing workflows can have unintended results and therefore this section defines not only how to edit workflows but also provides important information on the outcome of certain edits such as deleting and reordering steps of a workflow. To edit a workflow, click the 'Edit' button.
- Workflow
- Workflow Name - Editing the workflow name will update all workflows including those in progress and those that have been completed.
- Description - Updates the description for the workflow
- Available for: - Changes the forms that are available for the workflow going forward. Existing and completed workflows are not affected.
- Add a form type - Use your CTRL Key to select additional forms to be added to the workflow
- Remove a form type - Use your CTRL Key to deselect existing forms from the workflow
- Who Can Start This Workflow - Defines who can start new workflows and restart cancelled workflows.
- Add - Placing your cursor into this field will auto-populate a list of users and share groups. Type ahead to filter the list to a specific user or share group. Select the user or share group to be added
- Remove - Click the 'X' button next to the user or share group to be removed
- Save - Click the 'Save' button to save changes.
- Workflow Steps - To edit a workflow step you must be in edit mode on the workflow. Start by clicking the 'Edit' icon (Pencil) next to the step to be edited.
- Step Label - Enter a step label if desired. A step label entered under configuration will appear above that step in the visual workflow (e.g. Initial Reviewer)
- Send To(For Action)
- Completed workflows - No affect
- Workflows in progress
- Workflow before edited step - Change is reflected when the workflow reaches that step
- Added User - When the workflows gets to that step, it will go to all users noted in the 'Send To(For Action)
- Removed User - When the workflows gets to that step, it will go to all users noted in the 'Send To(For Action)
- Distribution List Use
- Users defined in the distribution list will be individually assigned to that step
- Users removed from distribution list (blank distribution list) - If a distribution list is blank when the step is reached, the step will fail back to the previous step. Notes will be entered on the failed step - "Empty distribution list. Please add a user to the distribution list or to the workflow step and retry." If the blank distribution list is on step 1, the workflow will cancel with a 'Restart' button.
- Workflow at edited step
- Added User - Does not retroactively share the document to the Send To(For Action) User. Added user does not show up in the existing workflow.
- Removed User - User should still see the workflow and is still required to take action. In cases where the step is 'All Must Approve' and the removed user is unavailable, an administrator can 'Log in as User' under My Company to take action as that removed user.
- Distribution List Use
- Modifying a distribution list while a workflow is at the step that includes users from the distribution list does not change the workflow step. Example; User A is 'Pending' step 2 and User A is removed from the distribution list that was assigned step 2. User A is still 'Pending Action' on step 2.
- Note - If a distribution list contains only one user or the step requires 'All' must approve and the distribution list user is only one 'Pending' and that user is removed from the project, the user is removed from the distribution list and the workflow step proceeds to the next step with note "This user has been removed from the project".
- Workflow after edited step
- Added User - Does not retroactively share the document to the Send To(For Action) User. Added user does not show up in the existing workflow.
- Removed User - Workflow history still shows the removed user.
- Distribution List Use
- Steps that have already been completed do not change, even if the distribution list changes.
- Workflow not started - No affect
- Who Must Approve (All vs. Any)
- Completed workflows - No affect
- Workflows in progress
- Workflow before edited step - Change is reflected when the workflow reaches that step
- Workflow at edited step
- Any to All - All users in the step must take action in order to move the workflow to the next step.
- All to Any - The next user to take action will move the workflow to the next step.
- Workflow after edited step - No affect on steps that have already occurred.
- Workflow not started - Change is reflected when the workflow is started and reaches that step.
- Days to Approve
- Completed workflows - No affect
- Workflows in progress
- Workflow before edited step - Change is reflected when the workflow reaches that step.
- Workflow at edited step - Change does not adjust the Due Date on the current step.
- Workflow after edited step - Change does not affect steps that have already been completed
- Workflow not started - Change is reflected when the workflow is started and reaches that step.
- With Instructions
- Completed workflows - No affect
- Workflows in progress
- Workflow before edited step - Change is reflected when the workflow reaches that step.
- Workflow at edited step - Instructions are updated on the current step.
- Workflow after edited step - No affect on the user interface. Instruction only show on current steps.
- Workflow not started - Changed instructions will be reflected on newly started workflows
- Also Copy(For Information)
- Completed workflows - No affect
- Workflows in progress
- Workflow before edited step - Change is reflected when the workflow reaches that step
- Workflow at edited step - Does not change the current step.
- Added User - Users are not copied via email and document is not auto-shared to the added user.
- Removed User - Document remains shared and users can access the document and see the workflow
- Workflow after edited step - Change does not affect steps that have already been completed
- Workflow not started - Change is reflected when the workflow is started and reaches that step
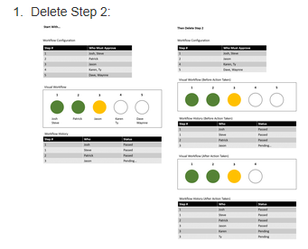
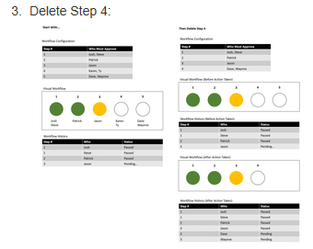
- Deleting/Adding Steps (Please see Helpful Screenshots below)
- Completed workflows - Change does not affect workflows that have already been completed
- Workflows in progress
- Workflow before edited step
- Deleted step(s) are updated on the workflow step chart. Deleted steps will not be present as the workflow progresses.
- Deleting steps moves the step following the deleted step forward.
- Added steps are appended to the workflow at the last step position.
- Workflow at edited step - IMPORTANT - Deleting a step where an existing workflow is at that step will cause the workflow to be cancelled. When a workflow is cancelled, a 'Restart' button will be present to restart the workflow. Only users who are identified in the 'Who Can Start This Workflow' can restart a workflow.
- Workflow after edited step - Change does not affect steps that have already been completed
- Workflow before edited step
- Workflow not started - Change is reflected when the workflow is started
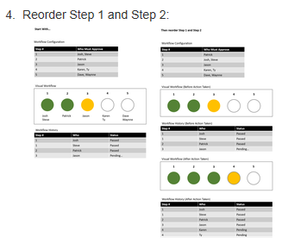
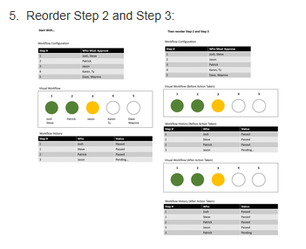
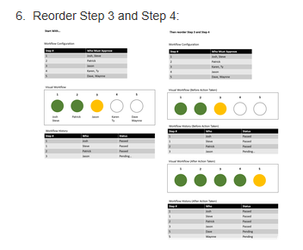
- Reordering Steps (Please see Helpful Screenshots below)
- Completed workflows - Change does not affect workflows that have already been completed
- Workflows in progress
- Workflow before edited step - Change is reflected when the workflow step is reached.
- Example: 5-Step workflow at step 3. Steps 4 and 5 are reordered. When action is taken on step 3 passing to step 4. what was step 5 will be the new step 4 and what was step 4 will be step 5 when step 4 passes.
- Workflow at edited step
- Reorder before - User requiring action at the step that is reordered remains on that current step with the current status (e.g. Pending). Once action is taken, the reordered step becomes current.
- Example: 5-Step workflow at step 3. Steps 2 and 3 are reordered. Step 3 user is still active as step 3 and once action is taken, the step 2 user becomes active as the new step 3 user to take action. Workflows going forward will show the previous step 3 in step 2 position. The workflow history will show step 3 twice, the original step 3 user and the new step 3 user who was previously step 2.
- Reorder after - 5-Step workflow at step 3. Steps 3 and 4 are reordered. Step 3 user is still active as step 3 and once action is taken, the step 5 user will be pending on step 4 as the previous step 4 was reordered to step 3 which is now beyond the workflow.
- Reorder before - User requiring action at the step that is reordered remains on that current step with the current status (e.g. Pending). Once action is taken, the reordered step becomes current.
- Workflow is in between the edited steps
- Example : 5-Step workflow at step 3. Steps 2 and 4 are reordered. Step 3 user is still active as step 3 and once action is taken, the step 2 user who is now step 4 is pending action. The previous step 4 does not get interjected into the workflow history but will become step 2 on newly started workflows.
- Workflow after edited step - Change does not affect workflow steps that have already been completed
- Example: 5-Step workflow at step 3. Steps 1 and 2 are reordered. Viewing the workflow history still shows steps 1 and 2 as they before the reorder took place.
- Workflow before edited step - Change is reflected when the workflow step is reached.
- Workflow not started - Change is reflected when the workflow is started
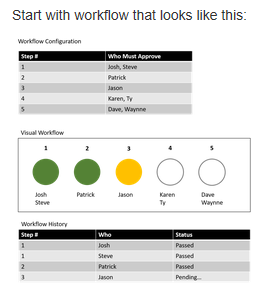
Helpful Screenshots